It's Proud Mommy time! I gotta brag!
Set-Up: My kids are taking swim lessons this week (DS's were last week, too) and they are enjoying them. Mommy isn't enjoying driving an hour round-trip for them, but they are a necessity (IMHO), so I'll deal.
Brag: DS jumped off the diving board twice last Friday! I was, and still am, so proud of him that I could bust! I really didn't think he'd do it because that's a pretty big thing to do and he's normally not much of a daredevil.
Secret: I was SO proud that I actually had to go to the bathroom to wipe my teary eyes! Shhh!! Don't tell anyone that I'm a sap!
Other Unrelated Stuff:
1. DH bought DS a used bike at a garage sale on Sat. DS has been having a ball riding it (with training wheels right now). He's had some spills, but no blood was drawn, so it's going well. I think DD needs a tricycle with all-terrain tires so she can ride it on the gravel.
2. DD has been a whiny 3-y.o. and it's wearing on our nerves! An internet friend gave me some words to say. She asks her DD "What do whiners get?" and her DD responds "Nothing!" (B/c it's true, ya know!) I've used it a couple of times and it's starting to sink in because DD replied "Nothing!" when I asked her that yesterday! Maybe it'll get her to stop some of her whining! Keeping my fingers crossed. ;oP
Monday, July 23, 2007
50s Housewife Dress!
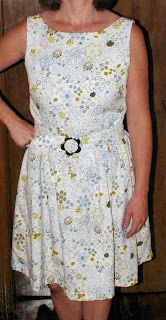 Pattern: Kwik Sew 3521
(Go to kwiksew.com and search for the pattern #)
From the pattern envelope: Misses' sleeveless dresses have fitted, lined bodice with bust and waist darts, gathered skirt, and center back zipper. View A has scoop neckline and contrast bias cut sash. View B has boat neckline and self-fabric belt with buckle.
I made View B in a Small.
What a great dress! My sister called this my "50s housewife dress" and I realized that the description was very apt!
This was my first try at a Kwik Sew pattern and I must say that it was great! The directions were very easy to follow and they weren't printed on big, flimsy, newspaper-like paper that you have to wrestle with. The pattern itself was printed on regular paper so it was very sturdy. The sizes on this multi-size pattern (XS-XL) are color-coded which made for easy cutting.
After great difficulty in finding appropriate fabric, I fell in love with some beautiful flower-patterned silky polyester at Joann Fabric. Since the material was pretty thin, I decided to line the entire dress with light cotton broadcloth so I could avoid wearing a slip. I also didn't want the skirt to stick to my legs (ew!). The lining also gave the skirt a bit more body which I like. The flower-shaped belt buckle is also from Joann.
The construction of this dress included a few firsts for me. This was the first zipper I have ever installed. It's not perfect, but it's doing the job it was intended. Practice, practice, practice!
This was also my first try at a blind hem on my sewing machine. Once I figured out (reading my sewing machine manual, of course) how to fold the hem and had gotten a bit of practice under my belt with some scraps, it was super easy to do. I'm just tickled pink that the hem turned out so nice!
Since this was my first try at dress-making, the bodice took a bit of fitting. I ended up removing the back darts since apparently my waist isn't as small as the pattern. Bummer, eh?
I shortened the skirt when cutting out the pattern, but I ended up hemming the skirt about 1.5 inches so it would hit right above my knee. I'm short! What can I say?
I really enjoyed making this dress--anticipating how it would turn out was torture and great all at the same time! I just hope it looks as good on me as I want it to. Maybe I'll get a better pic of me wearing the dress sometime soon.
Cheers!
Cabinet Topper
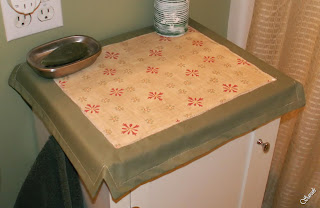
Pattern: Self-Drafted
This little cabinet topper was a quick and easy project! The top of this cabinet is getting ugly. It's sticky and marked up, so I decided to whip up this little topper to cover it.
I used cotton fabric in my stash leftover from a bag. I measured the top of the cabinet and added a 2-inch drop & 1/2-inch seam allowances. I cut out 1.5-inch squares from each corner--I thought it would help the topper lay a bit flatter on the cabinet. I sewed the green fabric, wrong sides together, and left an opening for turning. I clipped corners as needed and turned the whole thing right side out. I pressed the topper, then top-stitched about a 1/2-inch from the edge using a very long stitch. The top was very plain, so I cut a rectangle from another coordinating fabric and stitched it onto the top (yes, through both layers). I did a close zig-zag stitch 1) to hide/protect the raw edges of the patterned fabric and 2) to practice using the zig-zag stitch on my machine.
The photo on the right shows you a longer view of the cabinet and the topper. Sorry the color is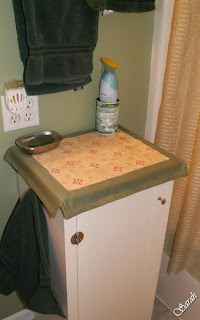 kinda weird in the photos. The shower curtain is also that sagey-green, but nicely textured and sorta sheer.
This topper is seriously nothing fancy and I didn't do the greatest job on it, but it's sorta cute and it's gonna do its job by covering the top of the cabinet. So, I'm happy with it! It cost nothing since I already had the fabric. It's washable and if it shrinks, I don't really care and could always make another! I think making a quilted topper would be rather fun and cute, but for right now, this will do!
This little cabinet topper was a quick and easy project! The top of this cabinet is getting ugly. It's sticky and marked up, so I decided to whip up this little topper to cover it.
I used cotton fabric in my stash leftover from a bag. I measured the top of the cabinet and added a 2-inch drop & 1/2-inch seam allowances. I cut out 1.5-inch squares from each corner--I thought it would help the topper lay a bit flatter on the cabinet. I sewed the green fabric, wrong sides together, and left an opening for turning. I clipped corners as needed and turned the whole thing right side out. I pressed the topper, then top-stitched about a 1/2-inch from the edge using a very long stitch. The top was very plain, so I cut a rectangle from another coordinating fabric and stitched it onto the top (yes, through both layers). I did a close zig-zag stitch 1) to hide/protect the raw edges of the patterned fabric and 2) to practice using the zig-zag stitch on my machine.
The photo on the right shows you a longer view of the cabinet and the topper. Sorry the color is
 kinda weird in the photos. The shower curtain is also that sagey-green, but nicely textured and sorta sheer.
This topper is seriously nothing fancy and I didn't do the greatest job on it, but it's sorta cute and it's gonna do its job by covering the top of the cabinet. So, I'm happy with it! It cost nothing since I already had the fabric. It's washable and if it shrinks, I don't really care and could always make another! I think making a quilted topper would be rather fun and cute, but for right now, this will do!
Girl's Dress
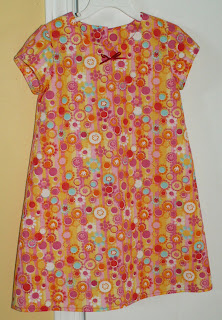
Pattern: Simplicity 4927
I made this dress for my daughter and she loves it! It was really easy to make. We found this adorable flowered seersucker at Wal-Mart. I think including the pattern, fabric, and interfacing, it cost about $5 to make!
This pattern has two dresses--one with sleeves; one without sleeves, but with pockets--and a small bag. This dress has a neck facing that I've never done before, so that was interesting to learn. It wasn't difficult to construct, just something new for me. I was worried about sewing the sleeves to the small armholes, but it worked out fine.
I followed the pattern instructions and made changes only in how I turned the garment to sew it on my sewing machine. I added the little dark pink bow as a finishing touch only to have my cat pull it off! That'll teach me to leave my sewing projects hanging from the living room closet door knob! It was easy to make a new bow and sew it on again.
My daughter loves this dress and wears it all the time!
Shirt
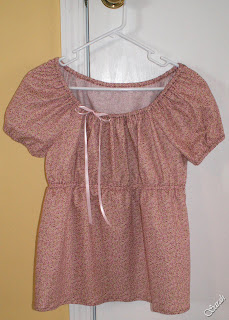
Pattern: McCall's M5050
My first foray into garment-making! I picked this pattern because it looked simple and the top is cute! This was an easy pattern to follow and I didn't make any alterations. I used a cute pink, green, and gold swirl cotton print from Joann Fabric.
My first foray into garment-making! I picked this pattern because it looked simple and the top is cute! This was an easy pattern to follow and I didn't make any alterations. I used a cute pink, green, and gold swirl cotton print from Joann Fabric.
Here's a close-up of the fabric:

Love the *idea* of this top, but I don't care for how I look in it. It feels and looks too "maternity" when I wear it. Maybe I would like it better if it were made in a different fabric--something stretchy and slightly clingy would've been better. Or maybe this style just isn't for me. I won't let that keep me from trying new clothing patterns, though!
Saturday, July 21, 2007
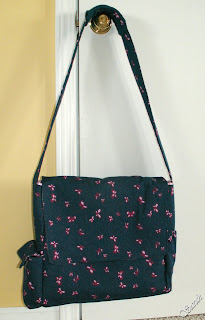
Diaper Bag
Pattern: Butterick B4560
This bag was a toughy, but it was worth the work! I got a great deal on this 14" x 13" x 5" messenger-bag-style diaper bag pattern on eBay.
I made this diaper bag as a gift for a friend. Together, we chose the outside fabric--an adorable stretch denim with pink butterflies from SewBaby.com! The inside is a pretty pink and white gingham.
I made this diaper bag as a gift for a friend. Together, we chose the outside fabric--an adorable stretch denim with pink butterflies from SewBaby.com! The inside is a pretty pink and white gingham.
I modified this bag by interfacing the lining sides and a few other parts with my usual Decor Bond interfacing when no interfacing was called for. I hate floppy linings! Otherwise, I followed the pattern instructions.
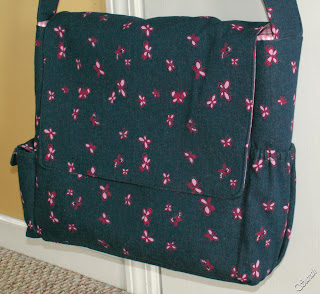 The construction of the bag was pretty simple, however, I ran into some issues with fabric layer thickness. The pattern calls for fusible fleece fused to the outside pieces. Kinda cool stuff, however, at some points there are literally 3 layers of fleece and up to 8 layers of fabric that you need to sew through all at once! Uh, my sewing machine CANNOT sew through that, so I ended up having to hand-sew quite a bit of this bag. I'm not really thrilled with doing a lot of hand-sewing (although I suppose it's good practice), so having to do that really slowed down my work and made the whole process take a lot longer. Bless my friend for being patient!
I ended up throwing away the fleece-lined handle and making another, shorter handle with the denim interfaced with Decor Bond. I just would not have been able to sew through that thick fleece and denim on the handle. Personally, I thought the handle was entirely too long anyway (I'm a shorty!).
I also had issue with the pattern directions! The directions made no mention whatsoever of when or where to attach the Velcro to the flap! I had already sewed the flap pieces together, trimmed the seam allowance to reduce bulk, and topstitched only to find that I *should have* sewed the Velcro onto the lining first! I had to hand-sew that darned Velcro on! Argh!
As a bonus, I decided to make a changing pad to go along with the bag. I made it without a pattern and flying by the seat of my pants. The vinyl-backed terry I found at SewBaby.com was pretty neat! I used a layer of the terry, then a layer of quilt batting, and two layers of the gingham. Turned out pretty cute, but best of all, it's very useable!
Everyone who has seen the diaper bag has really liked it and most importantly, so did my friend!
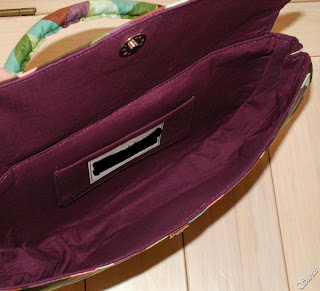
Velma Bag
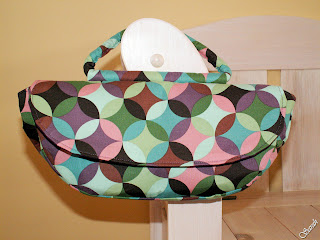
Pattern: Amy Butler's Velma Handbag
Wow! This was such an EASY bag to make! My sister requested this specific bag, picked out & ordered the fabric herself. It's a fairly small bag: 10.5" W x 6" T (9.5" T with the handle), approximately 3" D. My sister found a cool pin (not pictured) to add to the flap.
Modifications made:
1. Interfaced all bag pieces with Decor Bond, including the lining & pocket pieces, instead of using canvas.
2. Used a magnetic snap instead of velcro.
Quilted Bucket Tote
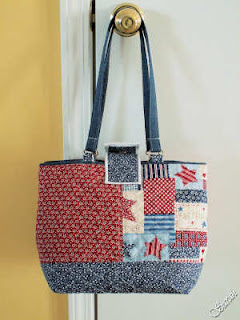
Pattern: None
Book: Bold Bags (A Leisure Arts book by Lazy Girl Designs)
This was a fun and easy bag to create! This tote was designed to be made from mock croc and faux leather, but after pricing the supplies, I decided to try the quilted version given on Lazy Girl's blog. This was my first stab at quilting, so it took a while to do, but it was a lot of fun to learn.
I modified this bag by...
1. Including pockets on the inside (I can't stand searching for my lip lube!),
2. Using a magnetic snap instead of velcro,
3. Placing the closure pieces on the front and back outside of the bag instead of the inside sides (I just liked the way this looked better),
4. Made my own handles using D-rings instead of purchasing faux leather handles,
5. Added a swivel hook to hang my keys on so I don't have to search for them, and
6. Made a matching, separate cell phone pouch from a free pattern I found online.
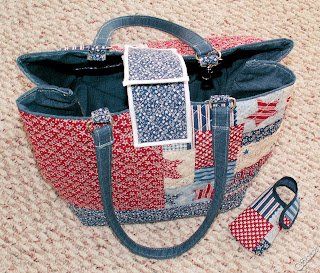
This bag ended up approximately 12" W x 10" D x 10" H. It's a bit too big for my personal tastes and I would interface the lining if I did it again to make the bag a tad more stable (I like a good sturdy bag!) even though this does stand up on its own, but I have been enjoying using it. I enjoy the quilted Americana look of it and there's definitely plenty of room in it! This bag was very easy to make. At some point in the future, I'd like to try some of the other bags in this book along with the mock croc and faux leather materials.
New Blog!
Welcome to my new blog! I'm going to start transferring my former sewing project gallery to this blog. I like the layout of the blog and I love to hear what others have to say about my projects. What better way to grow than to get some feedback?! Plus, I have so many pics of the kids that I should share with friends and family that are just sitting either on my computer or on my camera--it's such a waste! Bear with me while I get this set up and moving along!
Subscribe to:
Posts (Atom)
