Wednesday, November 14, 2007

Oh, So Busy & A Place to Eat

Sigh! I don't know where the day goes. (Oh yeah, stupid time change took some of it!) We've been so busy lately that I sometimes feel like I shouldn't sleep so I can get more stuff done. That's not gonna help, though, so I do sleep, of course. I've had 4-H, a township meeting, Mom's group, friends and hunters visiting, bags to finish, and cows to work. That's along with cooking, cleaning, taking care of the kids, and substitute teaching two days this week. Whew! It's times like these that I wish I didn't have so much to do. Of course, then I'd be bored, so it's a double-edged sword.

Good news is that my new dining room set arrived amidst the chaos last week! We LOVE it! It's so nice--the table is a little higher than our old one which means that Matt can sit at it more comfortably, and the chairs are very sturdy and comfortable. I no longer have to worry that someone may sit down and fall straight to the floor! The table is 42W x 50L, I think, and we got two leaves for when company comes. I love it's chubby legs! The kids still haven't figured out exactly which is "their seat." ;o) Here are a couple of pics:


Keep your fingers crossed that things are settling down now. I hope to get caught up soon on posting some photos here, too. I hope you all have a blessed week!

Saturday, November 3, 2007

A Little Toothless Grin

A visit from the Tooth Fairy is imminent this evening at our house. Garrett lost his first tooth today! I was eating my lunch in the office and he came in holding his little tooth in his hand and said, "Mommy, my tooth came out." He had the weirdest look on his face like he didn't know what to do or think about the whole thing! All I can say is that it's about time that he lost one. He'll be 7 on Dec. 1 and hadn't lost a tooth yet. He looks super-cute with it missing. Such a milestone for our little man!

Monday, October 22, 2007

Long Time, No Blog

Wow! It's been a long time since I blogged. We've been so very busy and have had so little time.


First, I'd like to ask for prayers for my FIL. He has been sick, in the hospital, and needs a liver transplant. Please pray for FIL, MIL who is his primary care giver, DH & his brother, and the rest of our family. This situation is very hard for all of us in so many ways. We all really need strength and understanding in God's will.


I've been busy with 4-H, subbing, a sick kid, all of my SAHM duties, my mom's group, sewing & getting project supplies, etc. I've been planning some projects for myself--gauchos and a jacket--and have several bags to make. You know I'll post pics when I get something finished!

Gracen's 4th birthday was last Wednesday. Gosh! Wasn't it just yesterday that I gave birth to that 9 lb. 4 oz. baby girl with an inch of dark hair on her head?! Time sure does fly! Gracen was sick on Monday & Tuesday, but my parents came to visit so they could be here on her birthday. They can do that since they're both retired, you know. ;o) I think she had a nice day even if we didn't do very much. DH's uncle drove up here from Kansas City to personally deliver a Disney Princesses backpack, sleeping bag, and water bottle to the birthday girl! It was really touching that he did that. My parents gave her a tricycle with all-terrain tires that will go on the gravel. We gave her a dress-up Polly toy where you "paint" her nails and hair with water and they change color. She really likes it--she really likes everything! We'll be having a little family party for her on Sunday, October 28. My whole family will be here and hopefully MIL and her sister can come for the day along with DH's grandma. I'll share some pics when I get the chance.

I hope you all have a blessed day! I'm going to go work on those gauchos!

Wednesday, September 26, 2007

Pajamas 2.0

Pattern: New Look 6641

My parents were in town for the weekend, so I had some time to finish DS's pajamas. I used the same pattern as DD's pajamas. I've decided that this pattern, though unisex, is shaped rather girlish. Possibly DS could've used a smaller shirt (the skinny kid!), but I just think the shape of the top and the bottom of the pants are a little girlie. It really doesn't matter since these are just pajamas, but it's something worth commenting on.

I used a green & tan camouflage jersey knit from Fashion Fabrics Club with which, frankly, I'm disappointed. This fabric is VERY thin and I'm not very confident that it's going to hold up, particularly in the waistband of the pants. It's my fault for choosing a "jersey knit" instead of something else. Live and learn, right?!

Since these jammies were for DS, I obviously didn't do the lettuce edges and puffy sleeve details. I'm REALLY happy with how well the neck band turned out (although I think the neck opening on this pattern is too wide in general)--no pleats or tucks or anything this time! I even got the sleeves eased in without any puckers! Yay! Everything went together well using both the serger and the sewing machine.

These pajamas were great for practicing sewing with knit fabric as well as practicing with the serger. I've learned quite a bit and hope that my sewing skills continue to grow as I sew!

Monday, September 17, 2007

Pajamas!

The fabric for the kids' pajamas arrived on Saturday as well as a 10 pound box of "mystery" fabric from Fashion Fabrics Club. My sewing process normally goes like this: I find a pattern I like, then I have to search and search to find appropriate fabric. I decided to try the box of mystery fabric to see what happens if I reverse the process. I got a few hopeful yardages, but there are some that I can't imagine using. You never know though!


The magenta knit I ordered for Gracen's pants was supposed to be an interlock knit, but based on the Understanding Knits class I took in June, I think it's actually a french terry. No matter. It's nice fabric--heavier than the fabric for the top--but so nice that I want some pants made out of it, too! OK, probably not magenta pants...


The green camouflage fabric for Garrett's pajamas has some gold in it. I like it, but I wasn't sure if he would. He says he doesn't mind the gold, so I guess we're good to go.


Armed with fabric, I tackled sewing Gracen's pants on Sunday. The fabric was easy to cut out. The directions were easy to follow. I had no problems using the serger and was wondering why anyone would make knit pajama pants WITHOUT a serger! To sew the waistband, I used a small zig-zag stitch--lets it stretch without popping stitches. I ended up cutting off about 2 inches from each leg. I *should've* measured DD before I cut the pattern out, but I didn't and I thought I would sew the extra up into the hem allowance. That was just too much fabric though, so I cut off the excess. Instead of doing a one-inch seam, I decided to just fold the allowance over twice, then did a LARGE zig-zag stitch over the bulk of it. I think it gives it a fun little touch. Feast your eyes...


These pants were *super-easy* to do. I think DD probably could've used a size smaller, but she is SO HARD to fit right now! She's very much between sizes and it appears that she's going to have her daddy's long torso and short(er) legs. Of course, mommy isn't tall, but at least all my parts are in proportion! ;oP I figure that she'll continue to grow into these and if needed, we can let the hem of the legs out as she gets taller. This mission has officially been accomplished!


I'll be starting Garrett's pajamas this afternoon. I won't be able to complete them today as I need more elastic for the waistband, but we'll see what I can get done.

Wednesday, September 12, 2007

New Dining Set!

A while back, we had a guy who works for a logging company call us to ask if we'd be interested in selling some trees on some land that we own. They were going to be next to our land and they thought it looked like there were some trees there that they could use. We decided to let them have our trees because we figured they would come on our land and get them anyway. (Many loggers are unscrupulous like that.) We figured that we might as well get paid for what they take! We don't use that section anyway because it's all timber. For those of you concerned about the environment, they took only certain trees that were the right size. They did not cut down the entire forest or anything!

So, to make a long story longer, because of the loggers, we now have a little extra money. We have been needing new dining room chairs for YEARS now. I've seriously been worried that someone is going to get hurt when one of those chairs falls apart underneath them! I decided to go ahead and get a new dining room set--table and chairs.

We went to the Amish or Mennonite-owned (don't know which!) Country Heritage Furniture in Jamesport. The set will be custom-made in oak and what they call Seely stain--basically a light oak color, but not as "golden" as what we've got now. We're getting a 42"x50" table, two leaves, and 6 chairs. We'll be able to comfortably sit 6 people at the table without the leaves and at least 8 people with the leaves. I'm so excited! The bad part is that we won't get the set until the second week of November. I guess I can't complain too much since I'm confident that I'm getting good quality furniture custom-made for me. Check out the pics of the floor model below.

Below is our current dining room and dining set. The table and chairs are all pretty old. We will keep the table for future use. I may eventually paint or do *something* with the buffet on the right of the photo just to break up all the brown from about waist-high and down. Or maybe I'll make some cute little slipcovers for my new chairs to bring in more color. We'll see!


This is the set we are getting. Same chairs, table top, and table legs, but it will all be a different color as well as a smaller size. This set is stained a cherry color. It's beautiful, but the color doesn't go with the rest of our house.


Here is a close-up of the chairs. The flash of the camera makes the finish look lighter than it is. There are no or very few LIGHTS in Amish & Mennonite stores!


Finally, this is a close-up of the legs of the table. I LOVE these! We had to make the table a bit longer just to accommodate these legs.
Argh! I can't get things formatted correctly on here. So please excuse the fact that things are lining up.

New Look 6641 Pajamas


Last Thursday, I finally got started sewing the kids the pajamas that I've been saying I would make them all summer! Originally, I was going to make short-sleeved PJs with shorts, but I think it's a little too late for shorts, so I decided to go for pants.

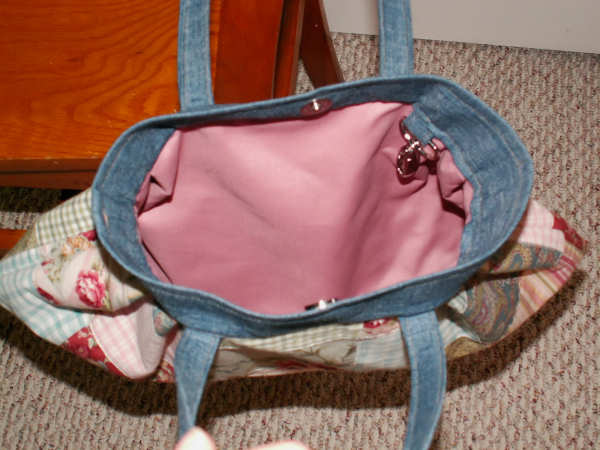
This all started when a friend asked me to make her a bag using some fun fabric from SewBaby.com. Once the fabric arrived, I knew that the knit fabric wouldn't work at all for a bag, so I decided to use it for some pajamas for DD. (The friend did get her bag in a different fabric!) I determined that I wouldn't have enough fabric to make both a top and pants, so I decided to make the top and I ordered a solid knit for the pants.

On to the review:

This pattern is for kids' pajamas. It's a multi-size pattern--sizes 3-8. It features a nighty, short-sleeved & long-sleeved shirts, pants, and shorts. There are cuff and hem options--regular or lettuce edge--as well as puffy or flat sleeve options. This pattern is sized for stretch knits only for the shirts and a variety of fabrics for the bottoms.

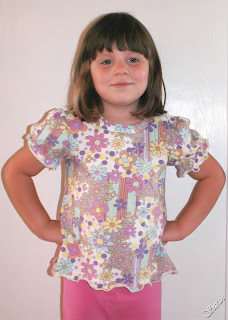
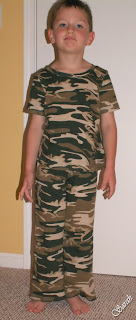
After measuring the kids, I determined they both needed size 5. (I'm sure DD will need her pants shortened.) I traced the pattern so I can use the other sizes for future pajamas. So far, I have made view D--the puff-short-sleeved top with lettuce edges.

This top should've been super-easy and in many ways it was. Cutting it out with the rotary cutter was super-fast. It also has only 5 pieces, so it's not a complicated construction. However, since I'm pretty new to sewing with knit fabrics, this top also gave me some problems.

The instructions were thorough and made sense for the most part. One thing I did not like, however, was sewing the elastic in the sleeves directly to the fabric. It was VERY difficult to do! In the future, I will probably make a casing, then thread the elastic through the casing. I think it would be more comfortable that way as well.

Now, onto the sewing errors and problems I had. These are totally and completely MY fault, by the way, not an issue with the pattern:

I had issues sewing the neck band to the top. This was the first time that I have done this, so while it's not perfect, I did pretty well if I do say so myself! If you don't sew, here's what you have to do: You have to stretch the neck band AS YOU SEW it to the neck edge of the top! It's a weird process. I did this on the serger, so when I discovered a pleat in the back of the shirt underneath the neckband, I decided to just leave it since I had no seam allowance left to work with. It's not a big deal since this is just a pajama top for DD.

I also did the lettuce edging on the sleeves and hem. This process gave me some problems as well. For you non-sewers, you can make a lettuce (ruffly) edge on the edges of the sleeves and the bottom of the shirt by using the rolled hem feature on a serger. You stretch the fabric as it goes through the machine so it leaves a cute lettuce edge. This is a pretty simple thing to do, but you have to understand that I'm new to using the serger! It's such a finicky machine! If it's not threaded EXACTLY correctly (and it's difficult to tell without unthreading and starting all over), it will NOT sew correctly! So, it took me a while to get everything set up and threaded correctly. Then, while lettuce edging one of the sleeves, there was trouble. I don't know exactly what happened, but part of the edge didn't come out right, so I had to cut *another* sleeve and do it again. Later, I had BIG problems with being able to tell how much fabric the blade was cutting off while I was lettuce edging the bottom of the shirt. I finally cut off the messed up parts and did the lettuce edging without using the blade. MUCH BETTER! Luckily, the pattern had a huge hem allowance and the shirt ended up just the right length for DD.

While I'm not super-happy with this top, it turned out OK. It was good practice sewing with knits and with the serger. I am not sure that I'll make this top for DD again, but we'll see. I will make her PJ pants next when the fabric arrives. I ordered a camouflage knit to makes DS's PJs and he's very excited. I'll blog about those items as I get them done.

Let me know what you think!

Monday, September 10, 2007

The Busy Life of a SAHM!

I have a lot of stuff to blog about that I'll get to sometime this week. Right now, I am sitting here, having my snack of Weight Watchers Vanilla Fat Free Yogurt mixed with 1/2-cup of Kashi Go Lean Crunch (highly recommend it), and thinking about the day...
  • Got up and helped get the kids off to school
  • Started Matt's laundry
  • Made & ate breakfast
  • Helped Matt move a truck
  • Worked out (The FIRM's Hi-Def Sculpt, if you're curious)
  • Picked up Gracen from preschool
  • Made phone calls
  • Switched laundry loads
  • Showered
  • Got Gracen lunch
  • Finished getting ready
  • Laundry to dryer
  • Made & ate lunch
  • Did some stuff online for a while
  • Put Gracen in the tub (she had green marker outlining her feet from yesterday's Children's Church project! So funny!)
  • Folded towels & Matt's laundry
  • Opened ton of mail
  • Paid bills
  • Started on township work (I'm the township clerk--fun)
  • Got Gracen out of tub & dressed
  • Trimmed Gracen's fingernails & toenails
  • Painted Gracen's toes
  • Garrett came home--trimmed his fingernails
  • Got kids snack
  • Finished township stuff
  • Filed papers
  • Cleaned litter box
  • Got kids more snack & myself a snack

And now I'm blogging after sending my sister an e-mail! Of course, interspersed in all of that is talking to Gracen and helping her with little things. Sadly, my day's not over. Here's the rest of the day's doings:

  • Go visit in-laws (Gracen needs to show off her red toenails!)
  • Make & eat supper (think it will be Roast Beef Burritos tonight)
  • Watch TV and cuddle kids for a bit
  • Help kids brush teeth
  • Get kids to bed with minimum of strife
  • Sit in chair and veg for a bit before heading to bed, too.

Whew! Of course, today's industrious-ness makes up for yesterday's total lack of mobility & accomplishment. We went to church, had lunch at the in-laws', then came home and were complete couch potatoes the rest of the day! It's pretty rare that we do that anymore, but it sure was nice--even if I did feel a little guilty.

I guess the moral of this is that Stay-at-Home Moms do a LOT, too, and never let anyone tell you otherwise!

Alrighty, I'd better jet! A little preview for you on some things I'll be blogging about this week:

  • Gracen's pajama top
  • New dining room set

Monday, September 3, 2007

What's With These Growing Kids?

Oh, how they grow! School has started and it won't be long before the weather starts to cool down. I love fall even though harvest takes my hubby away from me. At any rate, my weekend has me pondering what's with these growing kids?

Cooler weather means jeans and long sleeves. I know, you're thinking "It's stinkin' hot here! I can't even think about long sleeves!" That may be true (although we've been enjoying some nice weather lately!), but fall will be here before we know it. To that end, on Saturday I helped the kids try on all their winter clothes to determine what fit and what didn't.

Let's just say that the consignment store will be getting a load pretty soon!

I'm amazed at how much bigger DD is as compared to DS at the same age. I have a big girlie on my hands. She can't even wear DS's old jeans around the house/farm because his skinny butt needs slims! Oh well, at least the kids didn't complain too much during the clothes-trying-on procedure.

Since the kids were in need of clothes, we decided to go clothes shopping Sunday after church. I have to give my munchkins kudos for being super-patient throughout the whole thing! We ended up in JC Penney's for...FOREVER! DH and DS were in one fitting room while DD and I were in another trying on a TON of clothes. We'd send our respective "models" into the next fitting room to get that parent's approval of that particular outfit. It was like musical chairs. Sort of. Anyway, I regret that we left a mess in the fitting rooms, but in our defense 1) there was no clothes rack on which to place vetoed clothing, and 2) we needed to get the heck out there because we'd been in there so long! I did give the clerks a heads-up, though. Don't you think that was sufficient?

I've determined that finding clothes for kids is just like finding clothes for myself--no two pair of jeans ever fit the same regardless of brand. So, we got DD some 5T things, but we found that size 5 girl's regular Arizona jeans fit her the best. Yep, my not-quite-4-year-old wears a 5! Wow! Even Garrett got a variety of sizes of clothing. Guess that's why God made fitting rooms. I'm just amazed at how fast these kids are growing!

We had a successful shopping trip with the kids getting clothes, I got a shirt and some shoes, and DH bought himself Final Fantasy something-or-other for the Nintendo DS as his belated birthday/early anniversary gift. We were all pretty pooped by the time we got home at almost 8 p.m.

I haven't labored too much on this Labor Day. I did end up redoing the Gallery section of my Bumblebee Bags site. Feel free to check it out and let me know what you think. It was getting too cluttered having everything on one page. Plus, the changes will make for faster downloading for those of us still using dial-up. I rock! ;oP

I hope you've had a fabulous holiday weekend and that you have a great week!

Tuesday, August 28, 2007

Pretty Patchwork Metropolitan Bag

Pattern: Indygo Junction IJ758 (The Metropolitan Handbag)

From the pattern envelope: "This simple style purse can change its look by simply changing its fabrics and/or its handles length. Create several moods by either using romantic vintage bark cloth or retro reproduction fabrics or even your classic cotton prints for a different look each time. The purse measures 19" wide at the lower edge and 11" tall excluding handles and has a magnetic snap closure. By using different combinations of fabrics you can create your own fashion statement. So be creative! Be daring!"

The finished dimensions of this bag are 19" W x 11" H and the pattern includes two handle lengths. I chose the longer handles. I used the country patchwork fabric about which I have previously blogged and blue denim-look weaver's cloth from Wal-Mart.

This bag is very easy to sew. I love the shape! It's roomy, but you don't have to worry about stuff falling out of the top. Also, the long handles are *just* long enough for the bag to go on my shoulder while wearing a t-shirt. If you like a *shoulder*bag, I recommend lengthening the straps.

At first, I wished this bag had pockets. I thought about adding some myself, but then I realized that the items I would keep in a pocket would come out anyway whenever I lay the purse down. I worry about having my cell phone loose in the bag, but I may make a matching cosmetic-type bag in which to carry those small loose items like lip lube & wipes.

A couple of problems I had with the pattern:

1. The instructions say to place the magnetic snap on the top band where the pattern indicates. Hmm... There's no marking on the pattern for the snap. Of course, it's pretty easy to find appropriate placement yourself.

2. When I went to pin the top band to the bag bottom, I found that the band circumference was too big for the bag body! I'm not sure if this was an error on my part or what--maybe I didn't cut the band correctly or maybe I didn't fold the pleats in the bag body correctly? (They look fine, though.) Nevertheless, I had to take out the topstitching and the seam stitching, cut off an extra 1/2-inch, then sew it all back together. All was well after that.

I followed the instructions for the bag except...

1. I added a swivel hook on the inside for my keys. I don't like having to fish around for them.

2. Instead of whip-stitching the band to the lining, I folded the seam allowance under, then topstitched it from the outside. This worked well.

3. I used Decor Bond interfacing on the entire top band piece, then folded it over per the instructions. I didn't want to buy Timtex since I already had Decor Bond.

This was a good, easy pattern with a very nice, satisfying outcome. It was easy to sew, didn't take much time nor much fabric. I'm sort of curious how it would look in leather.

Let me know what you think!

Monday, August 27, 2007

First Day of Preschool!

Today was DD's first day of preschool! She was so excited to go and sat quietly while she waited for the rest of the kids to arrive. She said she traced her name twice (a very good job, too!), colored a picture of Dora, and played outside. She seems to want to go back tomorrow. Oh, my babies are growing too fast!
Enjoy some pics taken before school...


Wednesday, August 22, 2007

First Day of School 2007

DS is off to his first day of first grade! He's very excited about starting school again, especially since a good friend of his will now be in his class. We always take some pics on the first day of school, so here's a few:


DD will start preschool next Monday. She's really looking forward to it. I'll have about 2.5 hours to myself in the mornings three days a week. Nothing fantastic will occur, but I'm sure I'll get my breakfast eaten and hopefully my workout in before I have to go pick her up. (What can I say, I'm not a morning person!) We're gonna have a little period of adjustment for the next few weeks while everyone gets used to the new schedule.

Sewing: I decided what to do with part of the patchwork fabric! I saw a review of Indygo Junction's Metropolitan Bag and thought that my fabric would look nice on this bag. I need to get a few more supplies, so I'll blog about this when I get it done.

Completely Unrelated to Anything: Don't bother buying Progresso's Light Southwestern-Style Vegetable soup. It has great stats: 60 cals. per 1 cup serving (2 per can), no fat, 12g carbs, 4g fiber, and 3g protein. While the flavor is good, there's barely *anything* in there to chew! It's mostly broth, so if you like to sip broth and chase around the stray black bean, carrot, and tomato, then it's great--otherwise, get one of Progresso's broth-based regular soups for about 100-120 cals per serving. My fave is Minestrone. Mmmm! See, I told you this was completely unrelated to anything!

Cheers!

Sunday, August 12, 2007

Simplicity 4123 Tank Top


This is a fun little tank top! This top has a gathered front and back below the neck band. There are two variations--flutter sleeves (View A) and tank top (View B). This is a multi-size pattern in sizes 10-22. I made a size 10, one size smaller than usual because there is 8 inches of ease built into this pattern and I didn't want that much room.

The pattern calls for cottons/blends, silky types, and lightweight linen types. Originally, I was going to make this top out of a crinkle knit, but I found that I didn't have enough fabric. While perusing the sale table at Wal-Mart, I found a very stable polyester knit with fall-like colors/theme that I liked and for only $2/yd! I figured I wouldn't be losing much money if the top bombed!

Love the style and the fit of this top in this fabric! I think the gathering is really cute. This is a quick & easy top, especially if you don't need the instructions. I found some of the instructions confusing. This wasn't a difficult top, but I had to reread the instructions several times to "get" some of it. I'm sure you advanced sewers wouldn't even bother with the instructions! However, I thought the neck band facings were sort of weird and added some (possibly unnecessary) steps to the whole process. There is probably an easier way to create the neck band and straps than detailed in the instructions, but I usually like to stick fairly closely to the directions to give 'em a try.

I made a few modifications while sewing this top. First, I didn't put interfacing on the neck bands. Since I was using a knit, I thought I'd keep it slightly stretchy.

Second, I didn't use bias tape in the arm holes. I knew I wouldn't be happy with the look of purchased bias tape on this top and I decided I was too lazy to make my own. Plus, it just seemed unnecesary. Instead, I folded the arm holes to the inside twice, taking up the 5/8" seam allowance, and stitched them down. Worked fine.

Third, I didn't sew the narrow hem. I just folded the seam allowance to the wrong side and stitched it down. I *may* run into an issue with the hem flipping up. If so, I can always just fold the hem over again and stitch--this top is plenty long on me.

I had a heck of a time getting started on this top! I had problems finding the right needle to sew through the fabric without skipping stitches. I got out the serger and after lengthy set-up and experimentation to get the tension, etc. correct, I serged the side seams. I used my sewing maching for the rest of the project. It wouldn't have taken me nearly as long as it did to sew this top if I hadn't had problems starting out. It's all good, though, because it was a learning experience and I got a nice top out of it!

I'm very happy with how this top turned out! I will enjoy wearing it for the rest of the summer and plan to wear it under a jacket this fall.


Friday, August 3, 2007

Patchwork Perfect

I really love the cozy, country feel of patchwork. I've not done patchworking myself, but I think it's so adorable. I don't think I have the "eye" for putting together patchwork. I just don't know how people put together fabrics that don't seem to have a thing in common and it turns out looking so nice. Probably something I could learn if I gave it a try...or did intensive study!

That's why I was elated when I came across some patchwork fabric at the local Amish fabric store! The shop has mostly quilting cotton along with other fabric mostly used for the Amish's clothing. I like to shop there for fabric for my bags which was what I was doing. This isn't a printed fabric that just looks like it's patchwork--it's actual fabric squares sewn together in true patchwork fashion! Beautiful!

My original thought was to make a bag out of this. I'd like to make a taller bag than I usually do since I've had some requests for that--maybe 11"x11". I'd probably put a denim band around the top and denim handles with some type of ribbon on the denim band. That's my thinking at the moment. Hhhmm! I just don't want to waste the fabric as it was rather expensive at $11.50/yard. Eeek! I'd love to read your ideas if you have any!

Thought you'd like to know that I didn't squish anyone or anything (as far as I know) today while driving the big truck. I sorta felt like I was driving a semi, but it really wasn't too bad. Aren't you relieved?!

Have a great weekend!

Thursday, August 2, 2007

Miscellaneous Musings

As proud as I was of my little monsters for jumping off the diving board at swim lessons, neither of them passed their levels and will have to repeat next year. Oh well. The lessons gave them lots of confidence and less fear of the water which is excellent. DS just didn't seem to get how to coordinate his arms and legs. DH isn't too coordinated when it comes to stuff like that, so that's probably where he gets it from! ;oP I'm just really glad I don't have to drive all the way over there every day anymore! Whew!

DH and I attended my 15th high school reunion this weekend. It was a nice time. Fun to see all those people I grew up with. Everyone really looks great! Got lots of compliments on my hair and my dress (especially when I told people I made it! He he!). Good for the ole self-esteem!

Our van is off being fixed. We've had gas tank issues for a long time now and it's finally annoyed DH enough to have it fixed. The driver's side window won't roll down either. What's with vehicles that once the warranty is out and you've paid the car off that it starts to break down?! I get the privilege of driving around our farm's HUGE extended-cab dually pick-up truck until the van is fixed. Gonna be weird. Hope I don't squish anything or anyone with it!

Sewing: I have two bag projects for customers lined up for the next week or so. Going to get supplies this weekend.

Then, I'm not exactly sure which project I'll tackle next. I really need to find some knit fabric for some jammies (New Look 6641) for DS. I should also get started on DD's jammies. Sure would like to try the lettuce edge on the serger!

I have the supplies to make a tank top (Simplicity It's So Easy 4123) for myself--found some interesting knit fabric on the sale table at Wal-Mart. The knit is barely stretchy, so I think it'll work fine.

So many projects, so little time!

Have a great day!

Monday, July 23, 2007

Proud Mommy!

It's Proud Mommy time! I gotta brag!

Set-Up: My kids are taking swim lessons this week (DS's were last week, too) and they are enjoying them. Mommy isn't enjoying driving an hour round-trip for them, but they are a necessity (IMHO), so I'll deal.

Brag: DS jumped off the diving board twice last Friday! I was, and still am, so proud of him that I could bust! I really didn't think he'd do it because that's a pretty big thing to do and he's normally not much of a daredevil.

Secret: I was SO proud that I actually had to go to the bathroom to wipe my teary eyes! Shhh!! Don't tell anyone that I'm a sap!

Other Unrelated Stuff:

1. DH bought DS a used bike at a garage sale on Sat. DS has been having a ball riding it (with training wheels right now). He's had some spills, but no blood was drawn, so it's going well. I think DD needs a tricycle with all-terrain tires so she can ride it on the gravel.

2. DD has been a whiny 3-y.o. and it's wearing on our nerves! An internet friend gave me some words to say. She asks her DD "What do whiners get?" and her DD responds "Nothing!" (B/c it's true, ya know!) I've used it a couple of times and it's starting to sink in because DD replied "Nothing!" when I asked her that yesterday! Maybe it'll get her to stop some of her whining! Keeping my fingers crossed. ;oP

50s Housewife Dress!

Pattern: Kwik Sew 3521
(Go to kwiksew.com and search for the pattern #)

From the pattern envelope: Misses' sleeveless dresses have fitted, lined bodice with bust and waist darts, gathered skirt, and center back zipper. View A has scoop neckline and contrast bias cut sash. View B has boat neckline and self-fabric belt with buckle.

I made View B in a Small.

What a great dress! My sister called this my "50s housewife dress" and I realized that the description was very apt!

This was my first try at a Kwik Sew pattern and I must say that it was great! The directions were very easy to follow and they weren't printed on big, flimsy, newspaper-like paper that you have to wrestle with. The pattern itself was printed on regular paper so it was very sturdy. The sizes on this multi-size pattern (XS-XL) are color-coded which made for easy cutting.

After great difficulty in finding appropriate fabric, I fell in love with some beautiful flower-patterned silky polyester at Joann Fabric. Since the material was pretty thin, I decided to line the entire dress with light cotton broadcloth so I could avoid wearing a slip. I also didn't want the skirt to stick to my legs (ew!). The lining also gave the skirt a bit more body which I like. The flower-shaped belt buckle is also from Joann.

The construction of this dress included a few firsts for me. This was the first zipper I have ever installed. It's not perfect, but it's doing the job it was intended. Practice, practice, practice!

This was also my first try at a blind hem on my sewing machine. Once I figured out (reading my sewing machine manual, of course) how to fold the hem and had gotten a bit of practice under my belt with some scraps, it was super easy to do. I'm just tickled pink that the hem turned out so nice!

Since this was my first try at dress-making, the bodice took a bit of fitting. I ended up removing the back darts since apparently my waist isn't as small as the pattern. Bummer, eh?

I shortened the skirt when cutting out the pattern, but I ended up hemming the skirt about 1.5 inches so it would hit right above my knee. I'm short! What can I say?

I really enjoyed making this dress--anticipating how it would turn out was torture and great all at the same time! I just hope it looks as good on me as I want it to. Maybe I'll get a better pic of me wearing the dress sometime soon.

Cheers!

Cabinet Topper


Pattern: Self-Drafted

This little cabinet topper was a quick and easy project! The top of this cabinet is getting ugly. It's sticky and marked up, so I decided to whip up this little topper to cover it.

I used cotton fabric in my stash leftover from a bag. I measured the top of the cabinet and added a 2-inch drop & 1/2-inch seam allowances. I cut out 1.5-inch squares from each corner--I thought it would help the topper lay a bit flatter on the cabinet. I sewed the green fabric, wrong sides together, and left an opening for turning. I clipped corners as needed and turned the whole thing right side out. I pressed the topper, then top-stitched about a 1/2-inch from the edge using a very long stitch. The top was very plain, so I cut a rectangle from another coordinating fabric and stitched it onto the top (yes, through both layers). I did a close zig-zag stitch 1) to hide/protect the raw edges of the patterned fabric and 2) to practice using the zig-zag stitch on my machine.

The photo on the right shows you a longer view of the cabinet and the topper. Sorry the color is kinda weird in the photos. The shower curtain is also that sagey-green, but nicely textured and sorta sheer.

This topper is seriously nothing fancy and I didn't do the greatest job on it, but it's sorta cute and it's gonna do its job by covering the top of the cabinet. So, I'm happy with it! It cost nothing since I already had the fabric. It's washable and if it shrinks, I don't really care and could always make another! I think making a quilted topper would be rather fun and cute, but for right now, this will do!

Girl's Dress


Pattern: Simplicity 4927

I made this dress for my daughter and she loves it! It was really easy to make. We found this adorable flowered seersucker at Wal-Mart. I think including the pattern, fabric, and interfacing, it cost about $5 to make!

This pattern has two dresses--one with sleeves; one without sleeves, but with pockets--and a small bag. This dress has a neck facing that I've never done before, so that was interesting to learn. It wasn't difficult to construct, just something new for me. I was worried about sewing the sleeves to the small armholes, but it worked out fine.

I followed the pattern instructions and made changes only in how I turned the garment to sew it on my sewing machine. I added the little dark pink bow as a finishing touch only to have my cat pull it off! That'll teach me to leave my sewing projects hanging from the living room closet door knob! It was easy to make a new bow and sew it on again.

My daughter loves this dress and wears it all the time!

Shirt


Pattern: McCall's M5050

My first foray into garment-making! I picked this pattern because it looked simple and the top is cute! This was an easy pattern to follow and I didn't make any alterations. I used a cute pink, green, and gold swirl cotton print from Joann Fabric.


Here's a close-up of the fabric:
Love the *idea* of this top, but I don't care for how I look in it. It feels and looks too "maternity" when I wear it. Maybe I would like it better if it were made in a different fabric--something stretchy and slightly clingy would've been better. Or maybe this style just isn't for me. I won't let that keep me from trying new clothing patterns, though!

Saturday, July 21, 2007

Diaper Bag


This bag was a toughy, but it was worth the work! I got a great deal on this 14" x 13" x 5" messenger-bag-style diaper bag pattern on eBay.

I made this diaper bag as a gift for a friend. Together, we chose the outside fabric--an adorable stretch denim with pink butterflies from SewBaby.com! The inside is a pretty pink and white gingham.

I modified this bag by interfacing the lining sides and a few other parts with my usual Decor Bond interfacing when no interfacing was called for. I hate floppy linings! Otherwise, I followed the pattern instructions.


The construction of the bag was pretty simple, however, I ran into some issues with fabric layer thickness. The pattern calls for fusible fleece fused to the outside pieces. Kinda cool stuff, however, at some points there are literally 3 layers of fleece and up to 8 layers of fabric that you need to sew through all at once! Uh, my sewing machine CANNOT sew through that, so I ended up having to hand-sew quite a bit of this bag. I'm not really thrilled with doing a lot of hand-sewing (although I suppose it's good practice), so having to do that really slowed down my work and made the whole process take a lot longer. Bless my friend for being patient!

I ended up throwing away the fleece-lined handle and making another, shorter handle with the denim interfaced with Decor Bond. I just would not have been able to sew through that thick fleece and denim on the handle. Personally, I thought the handle was entirely too long anyway (I'm a shorty!).

I also had issue with the pattern directions! The directions made no mention whatsoever of when or where to attach the Velcro to the flap! I had already sewed the flap pieces together, trimmed the seam allowance to reduce bulk, and topstitched only to find that I *should have* sewed the Velcro onto the lining first! I had to hand-sew that darned Velcro on! Argh!

Despite all the issues I had making this bag, it was still a fun and interesting experience. I love all the pockets on this thing! It was fun to make the gathered and elastic pockets. There's even a key-keeping swivel hook, so you don't lose your keys in the bag.

As a bonus, I decided to make a changing pad to go along with the bag. I made it without a pattern and flying by the seat of my pants. The vinyl-backed terry I found at SewBaby.com was pretty neat! I used a layer of the terry, then a layer of quilt batting, and two layers of the gingham. Turned out pretty cute, but best of all, it's very useable!

So, would I make this bag again? Yes and no. I would make it again, but not using the fleece--it's just too thick to sew through a lot of layers. I would rather use either the Decor Bond interfacing throughout or maybe a slightly stiffer interfacing on the outside pieces.

Everyone who has seen the diaper bag has really liked it and most importantly, so did my friend!

Velma Bag


Pattern: Amy Butler's Velma Handbag

Wow! This was such an EASY bag to make! My sister requested this specific bag, picked out & ordered the fabric herself. It's a fairly small bag: 10.5" W x 6" T (9.5" T with the handle), approximately 3" D. My sister found a cool pin (not pictured) to add to the flap.

Modifications made:

1. Interfaced all bag pieces with Decor Bond, including the lining & pocket pieces, instead of using canvas.
2. Used a magnetic snap instead of velcro.


I'm really pleased with how this turned out. The instructions are VERY thorough (more thorough than your average pattern), but I like to have a lot of info. It was super-easy to make and was fairly quick since it's so small. My sister is very happy with her new bag!

Quilted Bucket Tote


Pattern: None
Book: Bold Bags (A Leisure Arts book by Lazy Girl Designs)

This was a fun and easy bag to create! This tote was designed to be made from mock croc and faux leather, but after pricing the supplies, I decided to try the quilted version given on Lazy Girl's blog. This was my first stab at quilting, so it took a while to do, but it was a lot of fun to learn.

I modified this bag by...
1. Including pockets on the inside (I can't stand searching for my lip lube!),
2. Using a magnetic snap instead of velcro,
3. Placing the closure pieces on the front and back outside of the bag instead of the inside sides (I just liked the way this looked better),
4. Made my own handles using D-rings instead of purchasing faux leather handles,
5. Added a swivel hook to hang my keys on so I don't have to search for them, and
6. Made a matching, separate cell phone pouch from a free pattern I found online.


This bag ended up approximately 12" W x 10" D x 10" H. It's a bit too big for my personal tastes and I would interface the lining if I did it again to make the bag a tad more stable (I like a good sturdy bag!) even though this does stand up on its own, but I have been enjoying using it. I enjoy the quilted Americana look of it and there's definitely plenty of room in it! This bag was very easy to make. At some point in the future, I'd like to try some of the other bags in this book along with the mock croc and faux leather materials.

New Blog!

Welcome to my new blog! I'm going to start transferring my former sewing project gallery to this blog. I like the layout of the blog and I love to hear what others have to say about my projects. What better way to grow than to get some feedback?! Plus, I have so many pics of the kids that I should share with friends and family that are just sitting either on my computer or on my camera--it's such a waste! Bear with me while I get this set up and moving along!